A deck can transform your backyard by creating a fantastic outdoor entertaining area for the whole family. Building a deck starts with setting a sturdy foundation. Deck footings are particularly crucial in deck construction because they supply a solid foundation to support your deck.
The foundation must support the weight of deck materials and the people who use the deck, so this construction project requires footings. Your deck’s design will decide how to live, and dead loads are transferred from different deck sections to concentrated points of contact with the ground. The more footings your deck must distribute the total load, the less weight each footing will need to carry.
Then how to build deck footing? Here’s a guide to building deck footing.
Type of Deck Footings
There are several types of deck footings. The following four footings are the most common.
Tube Pier
The tube footing is one of the easiest to install. Check with your local building department to decide the proper tube footing diameter and depth for your project. It consists of a long cylinder of cast or poured concrete of the same diameter from top to bottom. The base of the tube footing must be on solid compacted soil and below the local frost line. It’s always a good idea to excavate at least 4 inches below the local frost depth to be safe. Tube footing relies on the friction of the soil touching the sides of the pier to help support it and works best in soils with high clay content. Tube footings should be avoided in sandy soils. The diameter of the tube pier must be the same from the top to the bottom of the hole.
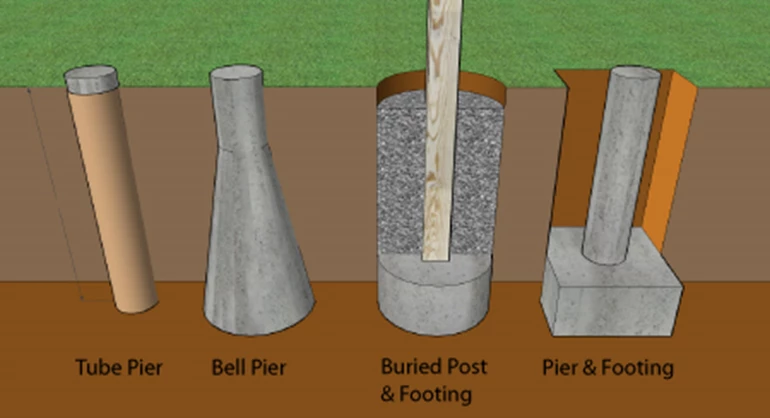
Buried Post & Footing
The buried post & footing is the most basic deck footing. The hole you dig doesn’t have to be perfect; all that’s important is the final 8 or 10 inches of excavation, which must be the required diameter of the footing. Mix, then pour the concrete into the hole, level it, and finish it somewhat smoothly with a block of wood. While this deck footing is straightforward, check with your local building department to verify that burying the post in the ground is allowed, even though the post may be rated for ground contact.
Pier & Footing
A pier & footing is advanced for a casual DIYer. It typically requires two separate concrete pours. The actual footing is poured first deep in the soil, then once the footing has achieved its first set pier can be poured on top of the footing.
Bell Pier
A bell pier is achieved by using a manufactured plastic form which is placed in the footing hole and filled with concrete. Bell piers offer several distinct advantages. As the pier gets deeper into the ground, the diameter of the pier gets larger. This allows the weight of the deck above to be spread out over a greater amount of soil. The other advantage is a bell pier can resist, to a large degree, the upward lift force of frozen soil that is in contact with the upper parts of the pier. The larger bottom of the pier acts like a wedge anchor you might use in a masonry wall.
Tools and Materials You’ll Need
Tools
- Shovel
- Tape measure
- Level
- Protective gloves
- Safety glasses
Materials
- Digging bar or post hole digger
- Concrete mix
- Mixing container
- Post anchors or brackets
- Pressure-treated lumber or concrete blocks
- Gravel or crushed stone
- Fasteners (screws or nails)
Step-by-step instructions
1. Determine the location and size of the footings
- Consult your local building codes or regulations to determine the required depth and size of the footings for your specific deck.
- Mark the locations of the footings on the ground using stakes or spray paint.
2. Dig the holes
- Use a shovel or post-hole digger to dig the holes for the footings. The depth and diameter of the holes will depend on your local building codes and the specific requirements of your deck.
- Dig the holes deep enough to reach below the frost line to prevent shifting or movement due to freezing and thawing.
3. Prepare the holes
- Ensure the bottoms of the holes are level and free from any debris or loose soil.
- Place a gravel or crushed stone layer at the bottom of each hole to improve drainage and stability.
4. Install the post anchors or brackets
- Attach post anchors or brackets to the bottoms of the holes according to the manufacturer’s instructions.
- Ensure the anchors or brackets are level and securely fastened.
5. Mix and pour the concrete
- Follow the concrete mix packaging instructions to prepare the concrete mixture in a mixing container.
- Pour the concrete mixture into each hole, filling it to the desired level.
- Use a group to ensure the post anchors or brackets remain level during the pouring.
6. Set the posts
- Place the pressure-treated lumber posts or concrete blocks into the wet concrete, ensuring they are aligned with the post anchors or brackets.
- Adjust the position of the posts as necessary to ensure they are plumb and level in all directions.
- Use braces or supports to hold the posts until the concrete fully cures.
7. Allow for curing
- Follow the manufacturer’s instructions for the recommended curing time of the concrete. This typically takes several days.
- Avoid placing any weight or load on the footings until the concrete has fully cured.
8. Attach the deck framing
- Once the footings have fully cured, attach the deck framing to the posts using appropriate fasteners such as screws or nails.
- Follow the construction plans or manufacturer’s instructions for the specific deck design.
It’s essential to consult your local building codes and regulations before starting any deck construction project. They may have specific requirements for deck footings, such as depth, size, or additional reinforcement.
Building deck footings is a critical step that ensures the stability and durability of your deck. Taking the time to construct the footings properly will help ensure a safe and long-lasting deck structure. If these points make you demand, you can contact us. We will help.
Comments
[…] Easy Way to Build Deck Footing […]